

Introduction:
Python is one of the best programming languages. Due to its readability and beginner-friendly nature, it has been accepted by industries around the world. So to master Python for any field you have to work on projects.
In this article, I will show you how to create a simple face detector using Python. Building a program that detects faces is a great way to get started with machine learning computer vision tasks. So I will introduce you here to a very easy way of face detection with Python.
I will use the OpenCV library in Python which is used as the primary tool for the tasks of computer vision in Python. If you are new to OpenCV then this task is the best to start with it.
Project Prerequisites:
First, you need to install the OpenCV library in Python which can be easily installed by using the pip command:
pip install opencv-python.

- To know more about the OpenCV library refer this link – https://docs.opencv.org/4.x/d6/d00/tutorial_py_root.html
- OpenCV library in python is blessed with many pre-trained classifiers for face, eyes, smile, etc. These XML files are stored in a folder. We will use the face detection model. You can download the pre-trained face detection model from here – https://raw.githubusercontent.com/opencv/opencv/master/data/haarcascades/haarcascade_frontalface_default.xml .
Save the file in the same Directory as the program.

- We also need to download an image and save it in the same directory as the program. This image will be used for face detection so make sure that there is at least one face so that the face detection program works.
- You can save the image with any name but, I will be using image.jpg as I am using the same in the program.
Getting Started:
First, we will create a folder for our project named “Face_Detection_Python”.

After, create a file named “Face_Detector.py”.

Code Implementation:
As we are using the OpenCV library so first we will be importing it using the import keyword.
import cv2
import cv2
Now we will use the xml file that we have saved in the same Directory as the program.
We will load it into the face detection program:
face_cascade = cv2.CascadeClassifier(‘face_detector.xml’)
face_cascade = cv2.CascadeClassifier('face_detector.xml')
The next step is to choose an Image on which you want to test your code. Make sure there is at least one face in the image so that the face detection program can find at least one face.
We will be using the image that we have downloaded and saved in the same directory as the program. The image is stored in a variable img that will be later used for face detection in the project.
img = cv2.imread(‘image.jpg’)
img = cv2.imread('image.jpg')
Now we’ll be detecting the faces.
The below code is used to detect the faces in the provided image.
faces = face_cascade.detectMultiScale(img, 1.1, 4)
faces = face_cascade.detectMultiScale(img, 1.1, 4)
Now that we have detected the face we need to draw a rectangle around it to show that we have detected a face and that is the face inside the rectangle.
For this, we will use a for loop and the faces variable in which the details of the detected face are stored. We will use the coordinates of the detected face to draw a rectangle around it to highlight it.
The rectangle method is also present in the OpenCV library so we can just directly use it to draw the rectangle.
We write these changes to a new .png file that will be created as an output of this project.
If we want to we can give our desired name for saving the face detected file. We just need to take input the name along with .png extension pass it to the imwrite method.
for (x, y, w, h) in faces:
cv2.rectangle(img, (x, y), (x+w, y+h), (255, 0, 0), 2)
cv2.imwrite(“face_detected.png”, img)
for (x, y, w, h) in faces:
  cv2.rectangle(img, (x, y), (x+w, y+h), (255, 0, 0), 2)
cv2.imwrite("face_detected.png", img)
At the end of the code we will print a prompt to make sure that the image is saved successfully or not.
print(‘Successfully saved’)
print('Successfully saved')
Source Code:
import cv2
face_cascade = cv2.CascadeClassifier(‘face_detector.xml’)
img = cv2.imread(‘image.jpg’)
faces = face_cascade.detectMultiScale(img, 1.1, 4)
for (x, y, w, h) in faces:
cv2.rectangle(img, (x, y), (x+w, y+h), (255, 0, 0), 2)
cv2.imwrite(“face_detected.png”, img)
print(‘Successfully saved’)
import cv2

face_cascade = cv2.CascadeClassifier('face_detector.xml')

img = cv2.imread('image.jpg')

faces = face_cascade.detectMultiScale(img, 1.1, 4)

for (x, y, w, h) in faces:
  cv2.rectangle(img, (x, y), (x+w, y+h), (255, 0, 0), 2)
cv2.imwrite("face_detected.png", img)

print('Successfully saved')
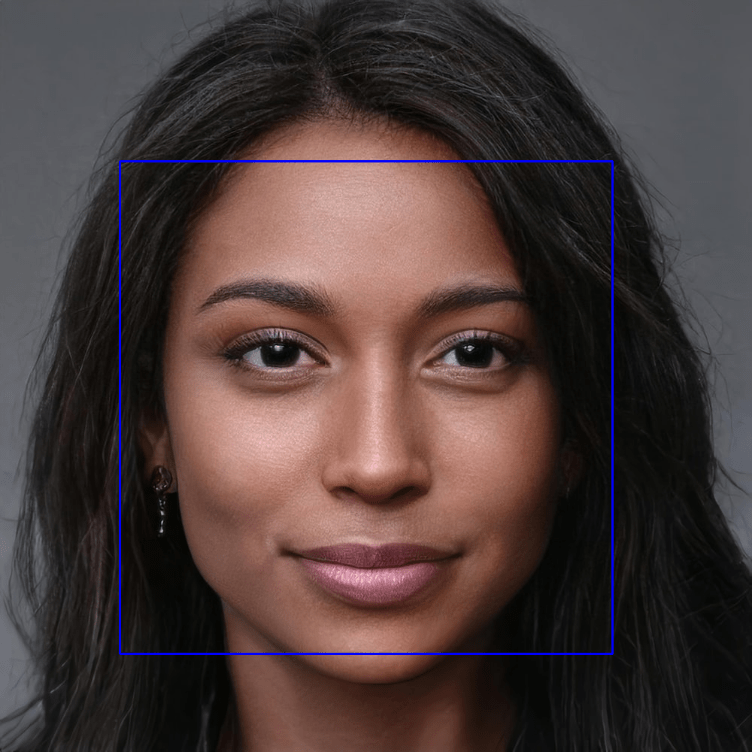
Output:
After we have run the code and it is executed successfully an image file will be created in the same directory as the program.
Sample Image Given:

Image Output:
Congratulations you now know how to create a face detector using python.
